Well, I've been a little busy with work, doing a couple custom orders. They are actually for kids, the Mom has one of my bracelets and wanted some for her little girls. Doing a Byzantine with hot pink. Debating on the clasps. I want cute because they are little girls but they have to be durable enough to withstand play. So i'm thinking a lobster...
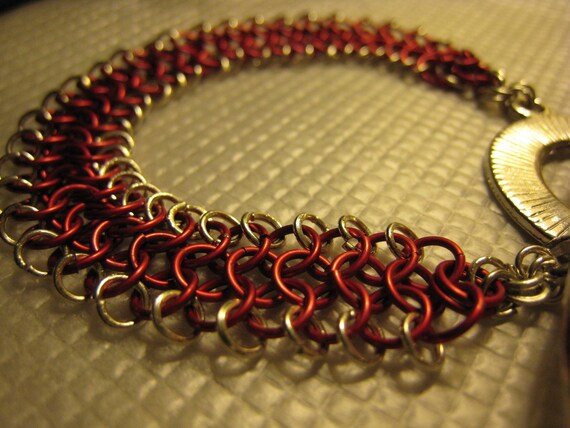
I also did this one for Valentines Day, real easy Euro 4-1 with smaller rings on the outer edges and an oversized clasp.
You can see more pics of this one here
Bridget Nolte of wyndsweptacres received her bracelet and ring in the mail, finally. I was pretty happy that she liked them.
The ring was actually one of the first ones I made. Copper and blue glass pearls. I wanted it to look like robins eggs in a nest.
The bracelet is made from square coppr jump rings, which were quite difficult to make. Staggered Byzantine between.
So thats what i've been up to. I'll try not to wait so long to post next time.
Crafters and friends
Showing posts with label copper. Show all posts
Sunday, February 6, 2011
Valentines Day
Labels:
B,
bracelet,
Bridget Nolte,
Byzantine,
chain mail,
copper,
crafting,
crafting a business,
creating the hive,
etsy,
jewelry,
jump rings,
SRobinsonDesigns,
wyndsweptacres
Thursday, January 13, 2011
Blog Designs
I guess the trick is, when you find a layout you like, stick with it. I've sat here for the last hour playin with all kinds of different bckgrounds and layouts, and I ended up going back to the one I started with. I looked at the dark for the last couple of weeks and kept sayin I had to go in and fix it. I didn't like that at all.
So, im not changing it again.
Posting a link to FB Fan page so you can see pics of the finished bracelet. I posted the WIP the other day.
Byzantine Variation Finished project. This is for a friend. She lives in Minnesota, cowgirl, dollmaker. I was goin for a country look, it has a bit of vintage, but thats ok, I think it will go well with her cowgirl boots!!
I have tomorrow off and hoping the sun will shine so I can get on the picture taking project. I have to do pics outside because I just don't have enough of a light source inside. Sunshine is better anyway, so thats my project for tomorrow.
So, im not changing it again.
Posting a link to FB Fan page so you can see pics of the finished bracelet. I posted the WIP the other day.
Byzantine Variation Finished project. This is for a friend. She lives in Minnesota, cowgirl, dollmaker. I was goin for a country look, it has a bit of vintage, but thats ok, I think it will go well with her cowgirl boots!!
I have tomorrow off and hoping the sun will shine so I can get on the picture taking project. I have to do pics outside because I just don't have enough of a light source inside. Sunshine is better anyway, so thats my project for tomorrow.
Monday, January 10, 2011
Byzantine Varaition
This one I just started putting together. I wanted to use some the copper flat wire rings I made for something. So this is what I came up with.
Each section of Byzantine is connected using two flat wire copper rings (6mm)
Another chain is made and attached next to the previous chain.
This is as far as i've gotten. This is a possible design for my bud Bridget. I wouldn't mind some feedback. She's a cowgirl from MN. So I really wanted to use something earthy like copper but i'm not sure if it's too dark.
I am going to use a hand forged clasp, also copper.
Hope everyone is staying safe out there today!!
Each section of Byzantine is connected using two flat wire copper rings (6mm)
This is as far as i've gotten. This is a possible design for my bud Bridget. I wouldn't mind some feedback. She's a cowgirl from MN. So I really wanted to use something earthy like copper but i'm not sure if it's too dark.
I am going to use a hand forged clasp, also copper.
Hope everyone is staying safe out there today!!
Friday, January 7, 2011
Well, it's been a busy week so far, i've only got one project done. It is a pretty simple design using Byzantine weave to make a focal point for a necklace. You can see on each link in the triangle there are three Byzantine links. Then they are linked together so the top half of the ring is visible.
The chain is just two in one. I put a magnetic clasp on this one. The necklace is really light, and only measures just over 14".
The new job is going well, I am training at a store in Spartanburg, I can't wait to get to my usual store. It is in walking distance, so there won't be any drive time.
Another thing i've been thinking about is shutting down my ArtFire store. I don't get hardly any sales there, so i'm thinking of just listing everything on my blog. I've seen other people list things on their blog and buy through email. I will have to do a little research about taking payments through paypal and such.
We gave two puppies away this week. They went to a wonderful home. They took a boy and a girl. Their names are Brutis and Bella now. The lady sent me an email the next day and said they had a good first night. I'm so happy they have a good home and they are not alone. And, they have four kids to play with...
The chain is just two in one. I put a magnetic clasp on this one. The necklace is really light, and only measures just over 14".
The new job is going well, I am training at a store in Spartanburg, I can't wait to get to my usual store. It is in walking distance, so there won't be any drive time.
Another thing i've been thinking about is shutting down my ArtFire store. I don't get hardly any sales there, so i'm thinking of just listing everything on my blog. I've seen other people list things on their blog and buy through email. I will have to do a little research about taking payments through paypal and such.
We gave two puppies away this week. They went to a wonderful home. They took a boy and a girl. Their names are Brutis and Bella now. The lady sent me an email the next day and said they had a good first night. I'm so happy they have a good home and they are not alone. And, they have four kids to play with...
Sunday, January 2, 2011
Chain Maille
I finished up the Dragonscale today. This weave gave me so many problems. I went through so many tutorials that I was about to give up. Then, one wonderful day, Sam and I were in Hobby Lobby, and I picked up a copy of Step by Step wire jewelry. Charlene Anderson wrote the best tutorial for this weave and guess what, I got it, finally. I don't know if I just needed a break from thinking about it but I like to think it was this article that helped me out. If you click on her name it will take you to the magazines website. It is the Dec-Jan issue. So here's the finished product. I used enamel coated copper, which were a total pain to cut and pre ordered GP 4mm.
Then, I got my step daughters watch band done, I just have to wait for the face to come in. So all-in-all it was a pretty good first day of the year.
Thursday, December 30, 2010
Wire Working
I thought I would play with some wire, get back into creating something after the holiday. I went to the library and picked up a couple books. One is an older one, published back in the 90's. It's called "Making Wire Jewelry" by Helen Clegg and Mary Larom. It's pretty good, it has in depth instructions and a gallery of photos in the center. There aren't a lot of photos throughout the book in the instructions but they are good enough that the drawings they use are sufficient. The ISBN, if you want to do a search for it, is 1-57990-002-X
So they first technique I tried in this one was the Egyptian coils. The authors explain that it is believed that the first time this was used was over four thousand years ago by an Egyptian goldsmith. It was the first time a necklace was produced using only wire.
I've seen these made before but never tried for myself. Here are a couple pics.
The one on the right is a bracelet made with purple enamel coated copper.
This is one of a pair of earrings made with black enamel coated copper.
There are a few other techniques in this book i'm going to try, I thought this one was the coolest though. The other book is on Viking weave and twisted viking weave and wire knitting. I'm gonna be busy....
So they first technique I tried in this one was the Egyptian coils. The authors explain that it is believed that the first time this was used was over four thousand years ago by an Egyptian goldsmith. It was the first time a necklace was produced using only wire.
I've seen these made before but never tried for myself. Here are a couple pics.
The one on the right is a bracelet made with purple enamel coated copper.
This is one of a pair of earrings made with black enamel coated copper.
There are a few other techniques in this book i'm going to try, I thought this one was the coolest though. The other book is on Viking weave and twisted viking weave and wire knitting. I'm gonna be busy....
Saturday, November 27, 2010
Odds and Ends
Have you praised your child lately?
The link above is a video short done by a college student. I think it was worth watching, hope you do too.
So, i'm working on a few things. Here is a set of earrings I did with the square wire. They need a little bit more work but I love the look of the Jade with the copper.
These will be available on my AF shop tomorrow.
I made jump rings with the wire. It was slow going but well worth it. I've started a couple things with those. Here's one, this is a section of Full Persian. The square wire gives it a nice look and I think it would make a nice mans bracelet.
This is a section of Helm Chain with silver plate and the square copper rings. I think I like this one better. It shows off the copper more.
So thats what i've been doin. Back to it, see you tomorrow..
The link above is a video short done by a college student. I think it was worth watching, hope you do too.
So, i'm working on a few things. Here is a set of earrings I did with the square wire. They need a little bit more work but I love the look of the Jade with the copper.
These will be available on my AF shop tomorrow.
I made jump rings with the wire. It was slow going but well worth it. I've started a couple things with those. Here's one, this is a section of Full Persian. The square wire gives it a nice look and I think it would make a nice mans bracelet.
This is a section of Helm Chain with silver plate and the square copper rings. I think I like this one better. It shows off the copper more.
So thats what i've been doin. Back to it, see you tomorrow..
Monday, August 31, 2009
A little stained glass
We only get back to New York once a year. So this year, since I started a new craft, I wanted to take presents home to the family. I was so nervous and I don't know why, because you always know that family is gonna love whatever you give them whether its butt ugly or gorgeous. Well, I hadn't been doing glass for long so I made some windchimes and suncatchers.
I love wind chimes made from stained glass. This is one that I made for my sister and her husband. The copper is recycled. It will tarnish(which some like) or you can put a coat of laquer on it. http://www.permalac.com/technicalfacts.asp
So my point is....drilling glass. I broke a lot of glass before I found an inexpensive and efficient bit to use. I started out in a hardware store and got a regular glass bit, sort of wedge shaped, metal....bad idea. It took about 15 minutes to drill one hole and it always chipped the back as it went through..so I got out my dremel with the flexshaft (makes it much easier), and went in search of the right drill bit.
http://www.drillglass.com/bifordrto.html
I went with one that they carry in walmart. Because lowes and home depot didn't have them. The package is for engraving but I used the one with the ball end and it worked well, they are diamond coated like the bits that go in the glass grinders. It took some time to figure out speed. Too fast will dull your bit but too slow will take forever. I keep my dremel set at about six.
Keep your bit wet..put your piece of glass in a bowl of water while drilling. I use a plastic shoebox, found at walmart for a $1.
I found that warm water will speed up the process slightly, but remember to put cold glass in slowly so it doesn't crack.
Start on a slower speed, till you get a groove in the glass, so the bit doesn't slip around and dig up the glass.
Remember to grind all the edges, even if you get a perfectly clean cut there are always sharp edges.
Subscribe to:
Posts (Atom)